DIY

10 Pot Painting Ideas Creative

Spread the love

Transforming basic clay terracotta pots and plain ceramic planters into custom hand-painted works of art is one of the most rewarding, high-impact craft projects for plant enthusiasts and home decorators alike. A simple houseplant instantly gains character, warmth, and artistic presence when housed in a uniquely designed vessel. Rather than settling for mass-produced, generic store-bought planters, painted pots allow you to introduce customized palettes, intricate textural finishes, and personalized geometric patterns that harmonize with your interior decor.

Achieving durable, gallery-worthy results requires an understanding of pot porosity, paint adhesion, and moisture barriers. Raw terracotta is naturally breathable and porous; without proper preparation and sealing, moisture from watering soil will seep outward through the clay walls, causing exterior acrylics to blister, bubble, and peel over time. By pairing proper internal waterproofing with high-pigment paints, modern texturizing techniques, and UV-resistant outdoor topcoats, your custom creations remain vibrant, waterproof, and long-lasting.
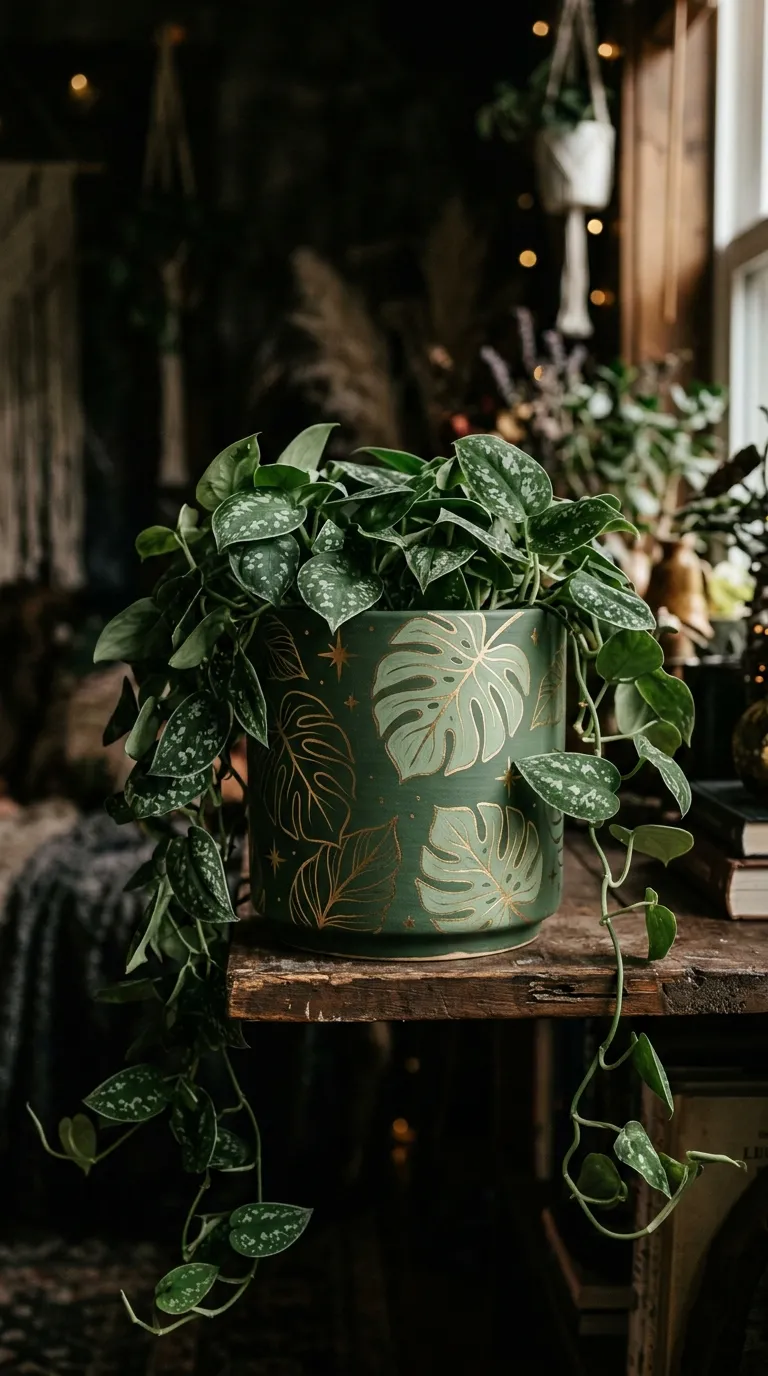
Whether you are aiming for earthy mid-century color blocking, intricate bohemian dot mandalas, modern terrazzo speckling, or Mediterranean tile patterns, hand-painted planters suit every aesthetic. This comprehensive guide covers essential clay preparation steps, waterproof priming workflows, ten distinct creative painting concepts, and expert maintenance strategies to keep your potted plant collection looking vibrant and beautifully styled.

Why This Idea Is Trending & Flattering

The surge in DIY pot painting projects stems from the intersection of modern plant styling, mindful crafting, and personalized home decor:

  • Customized Color Harmony: Hand-painting your planters allows you to match your room’s exact accent colors—such as terracotta, sage green, mustard, or cobalt blue—unifying scattered plant collections.

  • Low-Cost, High-Impact Home Elevation: Inexpensive raw terracotta pots (often costing only a few dollars) can be transformed into designer-look ceramic dupes for a fraction of boutique retail prices.

  • Therapeutic & Mindful Creative Expression: Repetitive painting techniques—like mandala dotting, fluid marbling, and continuous line art—offer a relaxing, hands-on escape that builds creative confidence.

  • Versatility Across Indoor & Outdoor Environments: When properly sealed with weather-resistant finishes, painted pots thrive equally well on indoor plant stands, sunny window sills, or outdoor garden patios.

  • Thoughtful, Personalized Gifting: A thriving plant nestled inside a hand-painted, personalized pot serves as a memorable housewarming, birthday, or holiday gift.

Materials, Preparation & Waterproof Setup Guide

Creating painted pots that survive regular watering and soil moisture requires specific non-toxic supplies and a clean preparation workflow.

Essential Tools & Crafting Supplies

  • Raw Terracotta or Unglazed Ceramic Pots: Clean, porous pots with pre-drilled bottom drainage holes.

  • Clay Pot Sealer (Aerosol or Brush-On Waterproof Sealant): Essential for coating the interior walls to prevent moisture seepage through the clay.

  • Multi-Surface Acrylic Paints & Acrylic Gouache: Highly pigmented, fast-drying, water-resistant paints that adhere firmly to clay.

  • Fine-Point Acrylic Paint Pens (0.7mm to 2mm): Perfect for crisp line work, botanical details, and intricate geometric patterns.

  • Assorted Synthetic Paint Brushes: Flat wash brushes for base coats, angled brushes for clean edges, and fine round detail brushes for line work.

  • Baking Soda or Plaster Powder (Optional): Mixed with acrylic paint to create a rich, matte, textured stoneware or ceramic finish.

  • Clear UV-Resistant Acrylic Topcoat (Matte, Satin, or Gloss): Protects finished exterior artwork against sunlight fading and scratches.

  • Sandpaper (220-Grit) & Tack Cloth: Smooths rough terracotta seams and prepares surfaces for even paint application.

Step-by-Step Preparation & Waterproofing Rules

  • Clean and De-Dust the Pot: Wipe down new terracotta pots with a damp cloth to remove loose clay dust and manufacturing residue; let dry completely for 1 hour.

  • Seal the Interior First: Spray or brush two generous coats of clay pot sealer inside the pot, extending down through the drainage hole. Allow 24 hours to cure completely; this critical step stops water from pushing through the clay and bubbling the exterior paint.

  • Apply an Exterior Basecoat/Primer: Brush on one to two even coats of gesso or white acrylic paint to create a neutral, non-porous canvas that makes colors pop.

  • Allow Proper Drying Between Layers: Let each paint layer dry for at least 30 to 45 minutes before applying tape, secondary colors, or detail work to prevent smearing.

Main Ideas & Style Variations

Painting Concept Core Medium / Technique Best Suited Aesthetic
Mid-Century Modern Abstract Color Block Matte acrylics & painter’s tape Retro Modern & Minimalist
Bohemian Mandala Dot Art Planter Dotting tools, multi-color acrylics Boho Chic & Global Eclectic
Moody Botanical Foliage & Gold Silhouette Dark acrylic base, gold leaf/metallic pen Moody Modern & Dark Academia
Mediterranean Blue Azulejo Tile Pattern Cobalt blue paint pens, white base Coastal, Spanish & French Country
Terrazzo Speckle & Pastel Stone Finish Flecked paint splattering, satin finish Contemporary & Memphis Design
Marbled Acrylic Dip Planter Water-swirled acrylics / marbling paints Modern Organic & Abstract Art
Whimsical Celestial Moon Phase & Stars Deep midnight navy, metallic gold & white Celestial & Witchy Boho
Textured Baking Soda Stoneware Wash Acrylic mixed with baking soda Japandi, Wabi-Sabi & Rustic
Continuous Monoline Face Silhouette Ultra-fine black paint pen on raw clay Modern Parisian & Minimalist
Gilded Kintsugi-Inspired Crackle Pot Metallic gold leaf paint, crackle glaze Antique Elegant & Transitional

1. Mid-Century Modern Abstract Color Block

Concept Overview & Aesthetic Appeal

Inspired by mid-century geometric prints, this design features overlapping arches, angled triangles, and bold color blocking in warm earthy tones like terracotta, mustard yellow, sage green, and cream. The clean, crisp lines deliver modern sophistication that pairs naturally with structured plants like snake plants and rubber trees.

Step-by-Step Execution & Painting Guide

  • Basecoat the entire exterior of the pot in a smooth, matte warm-cream acrylic.

  • Use low-tack painter’s tape to mask off sharp diagonal quadrants and arches across the pot.

  • Paint the masked sections with rich, contrasting earth tones (terracotta, olive, ochre).

  • Peel the tape while the paint is still slightly damp to achieve razor-sharp edges.

  • Add freehand circles or half-moons using a fine round brush for asymmetrical balance.

  • Seal with a matte UV-resistant clear coat once fully dry.

Pro Styling & Everyday Application Tips

  • Pair with a low-profile wooden plant stand in natural walnut or oak to enhance the mid-century look.

  • Keep the top rim of the pot a solid neutral color to frame the abstract lower shapes.

2. Bohemian Mandala Dot Art Planter

Concept Overview & Aesthetic Appeal

Using dotting tools or the ends of paintbrushes, this meditative technique creates symmetrical, intricate mandala patterns that radiate outward from the center of the pot. The vibrant, multi-layered dots produce an embossed, tactile finish with rich bohemian charm.

Step-by-Step Execution & Painting Guide

  • Paint the pot exterior with a solid matte black or deep navy basecoat to maximize contrast.

  • Find the vertical and horizontal center of the pot and make a small reference pencil dot.

  • Dip a medium ball-stylus dotting tool into white or turquoise acrylic paint and stamp a central circle.

  • Switch to smaller dotting tools, radiating concentric rings of dots outward in alternating colors (coral, gold, teal, white).

  • Walk smaller gradient dots along the outer arches to create teardrop mandala petals.

  • Allow the raised dots to cure for 24 hours before applying a protective gloss topcoat.

Pro Styling & Everyday Application Tips

  • Wipe your dotting tool clean after every few stamps to keep dot sizes uniform and crisp.

  • Use metallic gold or copper paint for the outermost ring to add a subtle shimmering halo.

3. Moody Botanical Foliage & Gold Silhouette

Concept Overview & Aesthetic Appeal

A dramatic design featuring deep forest green, charcoal, or plum backgrounds adorned with delicate hand-painted monstera leaves, ferns, and eucalyptus branches highlighted by metallic gold outlines. It brings a cozy, botanical greenhouse aesthetic into any space.

Step-by-Step Execution & Painting Guide

  • Paint the entire pot in a deep, matte forest green or charcoal black.

  • Sketch loose leaf silhouettes (monstera leaves, palm fronds, or ivy) using a soft white watercolor pencil.

  • Fill in the leaf shapes with varying shades of sage and olive green.

  • Use a fine-tip metallic gold acrylic paint pen to outline the leaf margins and draw delicate leaf veins.

  • Add tiny metallic gold stars and dots in the open negative space around the leaves.

  • Finish with a satin acrylic spray to protect the metallic pigment from tarnishing.

Pro Styling & Everyday Application Tips

  • Plant with trailing greenery like a satin pothos or string of hearts to echo the painted vine motifs.

  • The white watercolor pencil sketch easily wipes away with a damp cloth once painting is complete.

4. Mediterranean Blue Azulejo Tile Pattern

Concept Overview & Aesthetic Appeal

Inspired by traditional Portuguese and Spanish ceramic tiles (Azulejos), this crisp design pairs a bright white background with intricate geometric florals, scrollwork, and medallions rendered in rich cobalt and royal blue.

Step-by-Step Execution & Painting Guide

  • Apply two solid coats of crisp, bright white acrylic paint or gesso across the pot.

  • Use a flexible ruler and pencil to divide the pot circumference into four or six equal vertical panel zones.

  • Sketch traditional symmetrical tile motifs: four-petal florals, curved scrolls, and diamond borders.

  • Trace and fill the motifs using fine and medium cobalt blue acrylic paint pens.

  • Add delicate cross-hatching and dot accents to mimic historic hand-painted ceramic tiles.

  • Seal with a high-gloss clear varnish to recreate the reflective glaze of authentic ceramic tiles.

Pro Styling & Everyday Application Tips

  • High-gloss clear coats make basic terracotta pots look like expensive fired ceramic pottery.

  • Pair this style with aromatic herbs like rosemary, lavender, or basil on a sunny kitchen window sill.

5. Terrazzo Speckle & Pastel Stone Finish

Concept Overview & Aesthetic Appeal

Capturing the playful, retro look of polished Italian terrazzo stone, this design features irregular, confetti-like chips of color layered over a soft pastel base (such as blush pink, mint green, or warm beige). It adds subtle texture without overwhelming the plant.

Step-by-Step Execution & Painting Guide

  • Basecoat the pot in a soft pastel shade (e.g., pale peach, mint, or warm oatmeal).

  • Mix three to four contrasting paint colors (such as charcoal, terracotta, mustard, and white).

  • Dip a small flat brush into the first color and dab irregular, jagged geometric flecks randomly over the pot.

  • Repeat with each subsequent accent color, varying the sizes from tiny dots to larger stone-like chips.

  • Lightly flick a stiff-bristle toothbrush dipped in watered-down charcoal paint to add micro-speckles across the entire surface.

  • Seal with a matte or satin protective topcoat.

Pro Styling & Everyday Application Tips

  • Avoid uniform spacing; cluster a few flecks close together while leaving open areas to mimic genuine cut stone.

  • Terrazzo planters pair especially well with minimalist succulent groupings and cacti.

6. Marbled Acrylic Dip Planter

Concept Overview & Aesthetic Appeal

Using water-marbling techniques or fluid acrylic pours, this method creates organic, swirling ribbons of color that wrap fluidly around the pot. No two marbled pots are ever identical, giving each piece an original, marbled stone appearance.

Step-by-Step Execution & Painting Guide

  • Basecoat the pot in solid white and allow it to dry completely.

  • Fill a wide plastic bucket (deep enough to submerge the pot) with room-temperature water.

  • Drizzle several drops of high-flow acrylic marbling paints or oil-based craft paints across the water surface.

  • Gently swirl the colors using a toothpick or skewer to create dynamic, fluid marbling patterns.

  • Slowly lower the pot into the water at a 45-degree angle, rolling it smoothly to transfer the floating paint film onto the clay.

  • Lift the pot straight out and set it upside down on cups to dry for 24 hours before sealing.

Pro Styling & Everyday Application Tips

  • Wear disposable gloves to keep paint transfers clean and avoid staining your hands.

  • Stick to a controlled palette of three coordinating colors plus metallic gold to prevent colors from muddying.

7. Whimsical Celestial Moon Phase & Stars

Concept Overview & Aesthetic Appeal

A dreamy, cosmic design featuring a deep midnight-sky gradient transitioning from black to navy, decorated with realistic lunar moon phases, twinkling golden constellations, and delicate star clusters.

Step-by-Step Execution & Painting Guide

  • Paint a sponge-blended gradient across the pot, fading from deep black at the bottom to rich navy and indigo at the top.

  • Lightly splatter white paint using a toothbrush to create a dense background of distant starfields.

  • Paint a horizontal sequence of five moon phases (waxing crescent, first quarter, full moon, third quarter, waning crescent) around the center using white and metallic gold.

  • Draw fine constellation lines and four-pointed stars using an ultra-fine gold metallic paint pen.

  • Seal with a high-gloss or satin topcoat to give the midnight background deep visual dimension.

Pro Styling & Everyday Application Tips

  • The celestial theme pairs nicely with dark-foliaged houseplants like the ZZ Raven or Calathea.

  • Use a circular stencil (like a bottle cap) to keep the moon circles uniform in size.

8. Textured Baking Soda Stoneware Wash

Concept Overview & Aesthetic Appeal

Turn inexpensive terracotta into textured, rustic stoneware pottery. Mixing baking soda directly into acrylic paint creates a thick, sandy paste that dries to a chalky, ultra-matte ceramic texture reminiscent of antique artisan vessels.

Step-by-Step Execution & Painting Guide

  • In a plastic cup, mix 1 part baking soda with 2 parts matte acrylic paint (in shades like warm sand, terracotta, or off-white) until it reaches the consistency of thick frosting.

  • Brush the textured mixture onto the pot using broad, horizontal strokes with a stiff-bristle brush.

  • While wet, use a sea sponge or dry brush to dab the surface, creating natural pits and ridges.

  • Apply a second coat after 30 minutes to build depth and completely hide the smooth terracotta surface.

  • Once fully cured (24 hours), seal with a dead-flat matte protective spray to preserve the chalky stoneware look.

Pro Styling & Everyday Application Tips

  • Don’t worry about perfection; uneven ridges and subtle brush lines enhance the handmade wabi-sabi charm.

  • This textured finish works well with minimalist Japandi and rustic modern interiors.

9. Continuous Monoline Face Silhouette

Concept Overview & Aesthetic Appeal

Inspired by minimalist modern line art, this design features a single, continuous black line drawing of abstract faces, profiles, or hands painted directly over raw terracotta or a soft matte cream background.

Step-by-Step Execution & Painting Guide

  • Leave the raw terracotta natural or apply a solid basecoat of soft matte ivory.

  • Practice drawing a continuous one-line face or abstract portrait on paper without lifting the pen.

  • Lightly sketch the line onto the pot using a soft graphite pencil.

  • Trace over the pencil line with a steady hand using a medium-tip black waterproof paint pen.

  • Add small organic color splotches (like soft ochre or blush pink blush marks) behind the line art for depth.

  • Seal with a clear matte spray to protect the line work without adding artificial shine.

Pro Styling & Everyday Application Tips

  • Pair with plants that mimic hair—such as string of pearls, Boston ferns, or spider plants—to complete the portrait effect.

  • Keep line weights consistent around the entire circumference for a clean gallery presentation.

10. Gilded Kintsugi-Inspired Crackle Pot

Concept Overview & Aesthetic Appeal

Drawing inspiration from the Japanese art of Kintsugi (repairing broken pottery with gold lacquer), this technique uses crackle medium and metallic liquid gold leaf to create beautiful “fractured” gold veins across the surface of the pot.

Step-by-Step Execution & Painting Guide

  • Paint the pot in a solid base color of deep charcoal, emerald green, or matte white.

  • Apply a thin, even coat of crackle glaze medium over the dry basecoat and let it dry according to package directions.

  • Brush a contrasting topcoat over the crackle medium; fine cracks will immediately begin forming across the surface.

  • Once dry, use a fine detail brush dipped in metallic liquid gold leaf to trace along the deepest crack lines.

  • Add small gold-leaf accents along the upper rim of the pot to frame the piece.

  • Seal with a protective gloss or satin clear coat.

Pro Styling & Everyday Application Tips

  • Avoid brushing back and forth over wet crackle medium, as this can disrupt the cracking pattern.

  • Liquid gold leaf provides a much brighter, more reflective shine than standard metallic acrylic paint.

Common Beginner Mistakes & How to Avoid Them

  • Skipping the Interior Sealant Step: Planting directly into an unsealed painted terracotta pot allows water to migrate through the clay, causing exterior paint to blister and peel. Solution: Always apply two coats of waterproof clay sealer inside the pot before painting the outside.

  • Covering the Drainage Hole with Paint: Allowing thick paint or sealant to clog the bottom drainage hole leads to poor soil drainage and root rot for your plants. Solution: Place a piece of rolled painter’s tape inside the drainage hole during painting, removing it once dry.

  • Applying Heavy, Thick Paint Coats: Laying down thick layers of acrylic paint leads to brush streaks, uneven drying, and peeling. Solution: Apply two to three thin, even coats, allowing 30 minutes of drying time between applications.

  • Using Unsealed Water-Soluble Markers for Line Work: Using standard felt-tip or watercolor pens for details causes lines to bleed and run when clear sealer is sprayed over top. Solution: Always use oil-based or waterproof acrylic paint pens for line art and lettering.

Pro Tips, Maintenance & Plant Longevity Strategies

Frequency Maintenance Action Target Area / Focus
Weekly / During Watering Wipe rim & saucer with a dry microfiber cloth Top rim, outer base, drainage saucer
Monthly Inspect exterior paint for moisture bubbles Lower base & bottom drainage edges
Bi-Annually Dust textured & painted surfaces gently Outer relief details, textured washes
Annually Refresh clear topcoat on outdoor patio pots Exterior painted surfaces & rims
  • Use the “Nursery Pot Drop-In” Method: Instead of potting plants directly in soil inside your painted masterpiece, keep plants in plastic nursery pots and drop them into the decorative painted pot. This makes watering easy and keeps the painted pot completely clean.

  • Elevate Pots with Silicone Bumper Feet: Attach small clear silicone bumpers to the underside of the pot to keep it slightly elevated above the drainage saucer, preventing pooled water from soaking the base.

  • Clean with Mild Soap and Water Only: Never use abrasive scouring pads or harsh chemical cleaners on painted pots; wipe gently with a soft, damp microfiber cloth.

  • Bring Painted Pots Indoors During Freezing Winters: If displayed outdoors, bring painted clay pots inside before freezing temperatures arrive to prevent frozen moisture from cracking the clay.

Styling, Presentation & Plant Pairings

A hand-painted pot looks best when paired with plants that complement its artistic style:

  • Geometric & Color-Blocked Pots: Pair with structured, architectural foliage like Snake Plants (Sansevieria), ZZ Plants, or Rubber Trees (Ficus elastica).

  • Botanical & Line-Art Pots: Complement with trailing, cascading plants like String of Pearls, String of Hearts, English Ivy, or Satin Pothos.

  • Textured Stoneware & Terrazzo Pots: Pair with desert cacti, Haworthias, Echeverias, or Jade plants that match the earthy, stone-like texture.

  • Plant Stand Harmonization: Elevate your painted pots on mid-century wooden plant stands, black metal hairpin stands, or macramé hanging holders for added visual height.

Budgeting & Project Planning

Craft Supply Element Estimated Cost (USD) Usage / Longevity
Raw Terracotta Pots (Set of 3, assorted sizes) $6 – $15 One-time purchase
Interior Waterproofing Spray / Clay Sealer $8 – $14 Coats 8–10 pots
Acrylic Paint Set & Paint Pens $12 – $25 Lasts for dozens of craft projects
Assorted Brushes & Dotting Stylus Kit $6 – $12 Reusable indefinitely
UV-Resistant Clear Topcoat Spray $7 – $12 Seals 10–12 pots

Pot painting is an accessible and budget-friendly craft. For under $40 in basic supplies, you can easily paint and seal an entire collection of stylish, custom planters in a single weekend afternoon.

Creative Expansions & Advanced Inspiration

  • Glow-in-the-Dark Constellation Accents: Add subtle dots of non-toxic glow-in-the-dark paint over celestial star designs for a magical nightlight effect on bedside tables.

  • Decoupage Botanical Napkin Transfers: Use clear Mod Podge to adhere floral or botanical paper napkins onto a painted white base, blending the edges seamlessly with paint.

  • Chalkboard Label Sections for Herb Pots: Paint a rectangular section with black chalkboard paint so you can label growing culinary herbs (basil, mint, thyme) with chalk.

  • Ombre Clay Dip Dyeing: Dip the lower third of a painted pot into diluted color washes at varying depths to create a watercolor ombré effect.

Frequently Asked Questions (FAQs)

  • Can you plant directly into a hand-painted terracotta pot?

    Yes, as long as you seal the inside of the pot with a waterproof clay sealer first. This keeps water from seeping through the porous clay and lifting the paint off the outside.

  • What is the best paint to use on terracotta pots?

    Multi-surface acrylic paint or acrylic gouache is the best choice. Acrylic is highly pigmented, adheres well to clay, dries quickly, and cures to a durable, water-resistant finish.

  • Do I need to seal the outside of the pot after painting?

    Yes. Sealing with a clear acrylic spray (matte, satin, or gloss) protects your artwork from UV fading, scratches, and water drips during watering.

  • Can painted clay pots stay outside in the rain and sun?

    Yes, provided you use exterior-grade waterproof sealant on both the inside and outside of the pot. Bring pots indoors during winter if you live in freezing climates to prevent the clay from cracking.


Spread the love

Leave a Reply

Your email address will not be published. Required fields are marked *