Fairy gardens are enchanting little spaces where imagination meets nature. These miniature worlds, brimming with charm and whimsy, allow you to create a tiny, magical universe right in your own backyard, balcony, or even on a windowsill. Whether you’re a garden enthusiast or someone who loves crafting, building a fairy garden can be a fun and relaxing way to tap into your creative side.
A fairy garden typically includes tiny plants, miniature houses, fairies, and decorative accessories, but what makes it truly magical is the personal touch you bring to the design. DIY fairy garden crafts allow you to customize your fairy world with objects and features that reflect your personality and style.
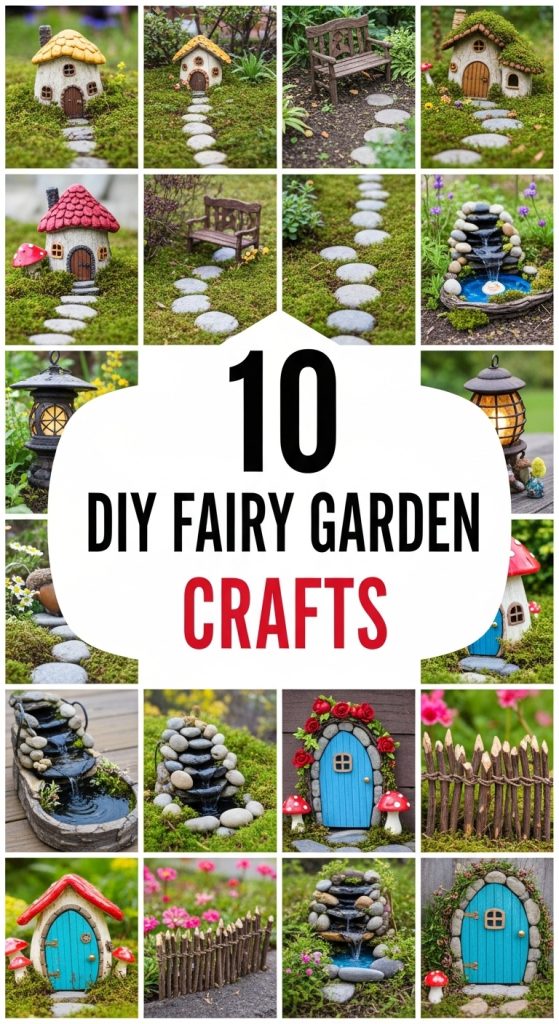
In this article, we’ll explore 10 DIY fairy garden crafts that are easy to make and perfect for beginners and seasoned crafters alike. From miniature furniture to magical pathways, these projects will add charm and enchantment to your fairy garden. So, gather your supplies, embrace your creativity, and let’s get started on crafting your own magical world!
1. Miniature Fairy Houses from Recycled Materials
One of the most essential components of any fairy garden is the fairy house, where the magical creatures live. Rather than buying a pre-made house, why not craft your own from recycled materials? You can make a fairy house using things like toilet paper rolls, wine corks, popsicle sticks, or even old matchboxes. These materials can be transformed into charming little dwellings with just a bit of creativity.
Materials Needed:
- Wine corks
- Popsicle sticks
- Toilet paper rolls
- Hot glue gun
- Paint (optional for adding color)
- Small decorative items (beads, buttons, fabric, etc.)
How To Make It:
- Start by deciding on the type of house you want to create. A small round house made from wine corks, or a quaint cottage built from popsicle sticks, both work beautifully.
- For a simple wine cork house, line up the corks to form a circle or square shape for the base.
- For a popsicle stick house, glue the sticks together to form the walls, roof, and door.
- Once the house structure is complete, paint it with your choice of colors—soft pastels work wonderfully for a whimsical look, or you can go for more natural tones like browns and greens for a rustic feel.
- Add details such as a fabric roof, small stones for a pathway, or buttons as windows.
Pro tip: You can also use moss or lichen to add a natural, overgrown look to the house, making it feel more magical and in tune with nature.
2. Tiny Fairy Furniture: Tables, Chairs, and Benches
Fairy gardens wouldn’t be complete without a cozy space for the fairies to sit and relax. Crafting miniature fairy furniture is a fun and easy way to bring life to your tiny garden world. You can make tables, chairs, and benches from everyday items like twigs, popsicle sticks, acorns, and small wooden blocks.
Materials Needed:
- Twigs or sticks
- Hot glue gun
- Small wooden blocks or beads
- Paint and brushes
How To Make It:
- For a simple fairy table, use a small wooden block for the tabletop and glue shorter twigs to each corner for the legs.
- For fairy chairs or benches, glue together smaller twigs or sticks to form the backrest and seat, making sure to secure them well with glue.
- You can use acorns as legs for the table and chairs to add a whimsical touch.
- Paint the furniture in soft pastel colors or leave it natural for a rustic effect. You can also use fabric scraps or moss for cushions on the chairs.
Pro tip: Add a small tea set or flower pots to the table for an extra bit of detail that will make the nook feel even more magical.
3. Fairy Pathways with Pebbles and Stones
Every fairy garden needs a beautiful pathway that guides the fairies through their tiny world. Creating a fairy pathway with pebbles, stones, or even broken ceramic is an excellent way to add texture and interest to your garden. This project can be as simple or intricate as you like, depending on the materials you choose.
Materials Needed:
- Pebbles or small stones
- Hot glue gun
- Broken ceramic tiles (optional)
- Sand (optional)
How To Make It:
- Start by laying out the pathway in your garden, deciding where you want the path to go. You can create a winding path or a straight line.
- Use hot glue to secure small pebbles or stones together. If you prefer a more rustic look, leave some gaps between the stones to allow moss or tiny plants to grow between them.
- You can also break up ceramic tiles or broken dishes to create a more eclectic and colorful pathway.
- Add a light dusting of sand between the stones for an added effect, or sprinkle some fairy dust (glitter) for a magical touch.
Pro tip: You can also add miniature lanterns or fairy figurines along the pathway for extra whimsy.
4. Moss-Covered Fairy Garden Rock
Rocks are a staple in any fairy garden, serving as both decorative pieces and functional elements. A moss-covered fairy garden rock is an easy DIY project that adds an earthy, enchanted vibe to your space. These moss-covered rocks can be used as seating, tables, or even as miniature houses in the fairy garden.
Materials Needed:
- Small rocks or stones
- Moss (real or artificial)
- Hot glue gun
- Small fairy figurines (optional)
- Decorative elements (flowers, mushrooms, etc.)
How To Make It:
- Collect a variety of small stones or pebbles. Clean them thoroughly if necessary.
- Use hot glue to attach real moss or artificial moss to the surface of the rock. Be sure to cover the entire surface for a lush, natural look.
- Add tiny fairy figurines, flowers, or mini mushrooms to the rocks to create a magical effect.
- Arrange the moss-covered rocks in your garden to create focal points or small clusters of greenery.
Pro tip: You can use miniature fairy benches or tea sets on top of these mossy rocks for a cute, functional space for your fairies to gather.
5. Fairy Garden Swing
Adding a fairy garden swing to your creation can make it feel even more whimsical and magical. You can create a tiny swing for the fairies using natural materials like twigs and string or ribbon. This tiny feature will bring an interactive and playful element to your garden.
Materials Needed:
- Thin twigs or sticks
- String or ribbon
- Hot glue gun
- Small beads or buttons (for decoration)
How To Make It:
- Cut two pieces of twigs to the desired length for the swing seat.
- Use string or ribbon to create the swing ropes by tying them to both sides of the seat and securing them at the top with twigs or a small branch.
- Decorate the swing with small beads or buttons for added detail. You can also add a fabric seat using scraps of cloth.
- Hang the swing from a tree or from a small structure in your fairy garden.
Pro tip: Position the swing near a mossy rock or tiny flower patch for the perfect picturesque setting.
6. Miniature Fairy Garden Pond
Every fairy garden needs a water element, and creating a miniature fairy garden pond is a simple yet stunning way to bring that aspect to life. Using a small container, you can craft a charming little pond that will serve as a serene oasis for your fairies.
Materials Needed:
- Small, shallow container (like a dish or tray)
- Blue glass beads or marbles (to resemble water)
- Small pebbles or gravel
- Miniature plants (like moss or water plants)
- Small fairy figurines (optional)
How To Make It:
- Start by selecting a small, shallow container to serve as the base of your pond.
- Fill the container with blue glass beads or marbles to mimic water.
- Surround the “water” with small pebbles or gravel to create a shoreline.
- Add miniature plants like moss or tiny water plants along the edge of the pond for a more natural look.
- You can place a tiny fairy figurine by the pond to enhance the magical atmosphere.
Pro tip: Add fairy lights around the pond for a shimmering, enchanted effect when lit up in the dark.
7. Fairy Garden Ladder
A fairy garden ladder is a whimsical way to create a vertical element in your fairy garden. This DIY project allows you to build a tiny ladder out of twigs or popsicle sticks that can be used as a decorative feature or as part of a fairy house.
Materials Needed:
- Twigs or popsicle sticks
- Hot glue gun
- String or twine (optional for decoration)
- Miniature flower pots or figurines
How To Make It:
- Cut the twigs or popsicle sticks to size for the ladder rungs and side supports.
- Use hot glue to attach the rungs to the sides of the ladder.
- Optionally, wrap string or twine around the ladder for a rustic, boho look.
- Position the ladder in your fairy garden and lean it against a miniature house, tree, or even a mossy rock.
Pro tip: Use the ladder to create a vertical garden by placing miniature flower pots on each rung.
8. Fairy Garden Bridge
A fairy garden bridge adds a sense of movement and flow to your miniature landscape, connecting different areas of the garden or spanning a small pond. Made from wooden popsicle sticks or twigs, this bridge can be as intricate or simple as you like.
Materials Needed:
- Popsicle sticks or twigs
- Hot glue gun
- Small stones or moss for the base
How To Make It:
- Arrange popsicle sticks or twigs to form the base of the bridge.
- Attach support beams underneath to give the bridge a realistic look.
- Use hot glue to secure the pieces and make sure everything is sturdy.
- Add small stones or moss to the base of the bridge to anchor it into your fairy garden.
Pro tip: Place the bridge near a pond or flower bed for a picturesque view that will make your fairy garden even more enchanting.
9. Fairy Garden Bench
Adding a fairy garden bench to your garden allows your fairy inhabitants a place to sit, chat, and relax. This small piece of furniture can be crafted from twigs or wooden craft sticks, and it brings a homey feel to the miniature garden.
Materials Needed:
- Twigs or wooden craft sticks
- Hot glue gun
- Small decorative items like beads or buttons
How To Make It:
- Use craft sticks to create the seat of the bench and attach twigs for the legs and backrest.
- Decorate the bench with small beads or buttons to give it a unique, whimsical flair.
- Place the bench in a cozy corner of your fairy garden for your fairies to sit and enjoy the surroundings.
Pro tip: Add a cushion made from felt or fabric to the bench to make it more inviting for the fairies.
10. Fairy Garden Wind Chime
A fairy garden wind chime adds a magical, calming element to your garden. The gentle sound of a wind chime can create a serene environment for the fairies, making your garden feel even more enchanted. You can craft a simple wind chime using small twigs, shells, and beads.
Materials Needed:
- Small twigs or branches
- Twine or string
- Beads, shells, or bells
- Hot glue gun
How To Make It:
- Cut several twigs to the desired length for the chimes.
- Attach them together using twine or string, ensuring that they hang evenly.
- Add beads, shells, or bells to the ends of the twigs for decoration and sound.
- Hang the wind chime in your fairy garden and let it gently sway in the breeze.
Pro tip: Add fairy lights around the wind chime for an added magical effect at night.
Conclusion: Craft Your Own Magical Fairy Garden
Creating a fairy garden is a fun and rewarding craft that allows you to design a magical world full of whimsy and charm. The 10 DIY fairy garden crafts we’ve explored provide a variety of options for bringing your fairy garden to life, from miniature houses and furniture to pathways and water features. These projects are not only easy and affordable but also allow you to personalize your fairy garden with items that reflect your style.
Whether you’re a seasoned crafter or just starting out, these DIY ideas will help you create a beautiful, magical space that will spark your imagination and provide a relaxing retreat in your home. So grab your materials, unleash your creativity, and start building your very own enchanted world today!


